Homemade Cherry Jam Low Sugar with Pomona Pectin
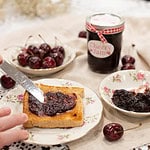
This Homemade Cherry Jam is bursting with the flavor of sweet cherries, lemon juice, and natural pectin. Perfect for toast, yogurt, or gifting!
Servings: 4 -5 Half Pint Jars
Calories: 22kcal
Equipment
- 1 Large stock Pot or Dutch Oven
- 1 Water Bath Canner
- 1 Jar Lifter
- 1 Slotted Spoon
- 1 Ladle
- 1 Bubble remover or a chop stick
- 1 Clean kitchen towels
- 1 Sterilized half-pint mason jars or pint jars
- 1 Large bowl
- 1 Cherry pitter (if using fresh cherries)
- 1 Measuring Cups and Spoons
Ingredients
- 4 cups mashed or simmered cherries start with 6 cups whole cherries before mashing or blending
- ¾ cup to 2 cups granulated sugar I use cane sugar or 1 cup honey
- 3 teaspoons Pomona’s Pectin
- 4 teaspoons calcium water
- ¼ cup bottled lemon juice
Instructions
- Prepare the Calcium Water
In a small jar, combine ½ teaspoon calcium powder (from the Pomona’s Pectin package) with ½ cup water. Shake well to dissolve. Store any extra in the refrigerator for later use. - Prepare Jars & Equipment
Wash jars, lids, and bands. Fill a canner 2/3 full with water, bring to a rolling boil, and sterilize jars for 10 minutes (add 1 extra minute per 1,000 feet above sea level). Keep jars warm in hot water. Place lids in a small saucepan with hot water and keep them at a low simmer until ready to use. - Prepare the Cherries
Rinse cherries thoroughly, remove stems, and pit them. Mash with a potato masher for a chunkier texture or use an immersion blender for a smoother consistency. If using frozen cherries, thaw before mashing. - Cook the Cherry Mixture
In a large saucepan, bring the mashed cherries to a simmer over medium heat. Stir occasionally and cook for 5 minutes, then remove from heat. - Add Lemon Juice & Calcium Water
Stir in ¼ cup bottled lemon juice and 4 teaspoons calcium water. Mix well. - Mix Pectin with Sugar
In a separate bowl, whisk together 3 teaspoons Pomona’s Pectin and ¾ cup to 2 cups sugar OR 1 cup honey until fully combined. - Cook & Thicken the Preserves
Bring the cherry mixture back to a full boil over high heat. Gradually stir in the pectin-sugar mixture, stirring constantly. Keep stirring for 1 to 2 minutes to dissolve the pectin completely. Once the preserves return to a full boil, remove from heat. - Can the Preserves
Ladle the hot preserves into warm jars, leaving ¼ inch of headspace. Remove air bubbles, wipe rims clean, and secure lids and bands until fingertip-tight. Lower jars into the canner, ensuring they are covered by 1 to 2 inches of water. Cover, return to a rolling boil, and process for 10 minutes (add 1 extra minute per 1,000 feet above sea level). Turn off heat, let jars sit in hot water for 5 minutes, then remove and place on a towel. Let jars cool undisturbed for 12 to 24 hours. - Check Seals & Store
After 12 to 24 hours, check that each jar has properly sealed. Press the center of each lid—if it does not pop or move, the jar is sealed correctly. If the lid pops up and down, the jar did not seal and should be refrigerated and used within a few weeks. Properly sealed jars can be stored in a cool, dark place for up to one year.
**DISCLAIMER**This recipe is based on safe canning practices; however, always consult the USDA Complete Guide to Home Canning or your local extension office for the most up-to-date and approved canning methods. Proper acidity levels and processing times are essential for safe home preservation. Adjustments may be needed based on altitude and specific canning guidelines.
These cherry preserves are perfect for toast, pastries, or swirling into yogurt! 🍒
Notes
Nutrition
Serving: 1g | Calories: 22kcal | Carbohydrates: 6g | Sodium: 1mg | Sugar: 6g