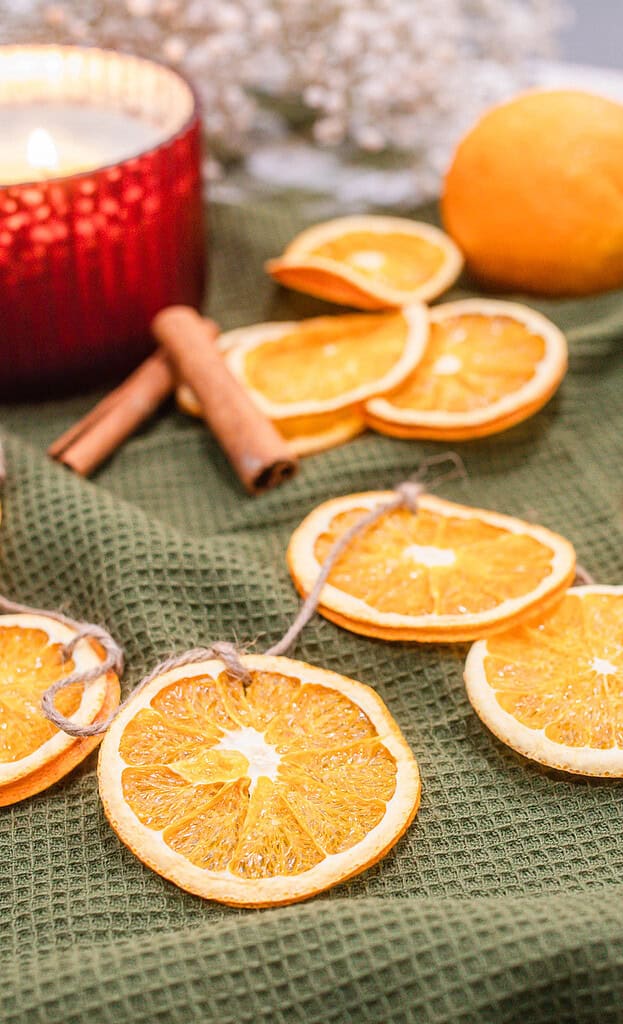
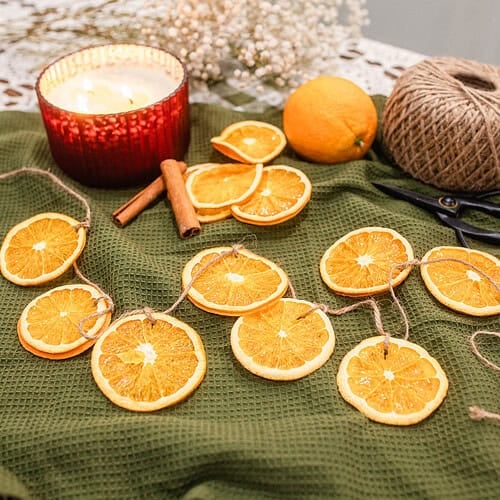
This DIY dried orange garland is an easy, simple DIY made from dried orange slices and twine. We love to make them at the start of Autumn and several more for Christmas, and extra slices for a simmering potpourri and handmade gift tags.
This project gives old-world nostalgia, and looks like decor from the “Little Women” novel.
For more cozy cottage-inspired projects, view these posts: DIY firestarters, simple Christmas wreaths, or a cozy cottage Christmas table setting.
This post may contain affiliate links. Please read our disclosure policy for details.
Why You’ll Love This
Materials You’ll Need
Styling Variations & Add-Ons
- Classic orange slice garland: Use only dried orange slices spaced evenly on natural twine. This keeps the look simple and works well with farmhouse and cottage-style decor.
- Orange and greenery garland: Tuck fresh or faux greenery like cedar, pine, or eucalyptus behind the garland on a mantel or shelf. This adds softness without changing the garland itself.
- Mixed citrus garland: Combine dried oranges with lemons or grapefruits for subtle color variation. Keep the slices similar in size for a balanced look.
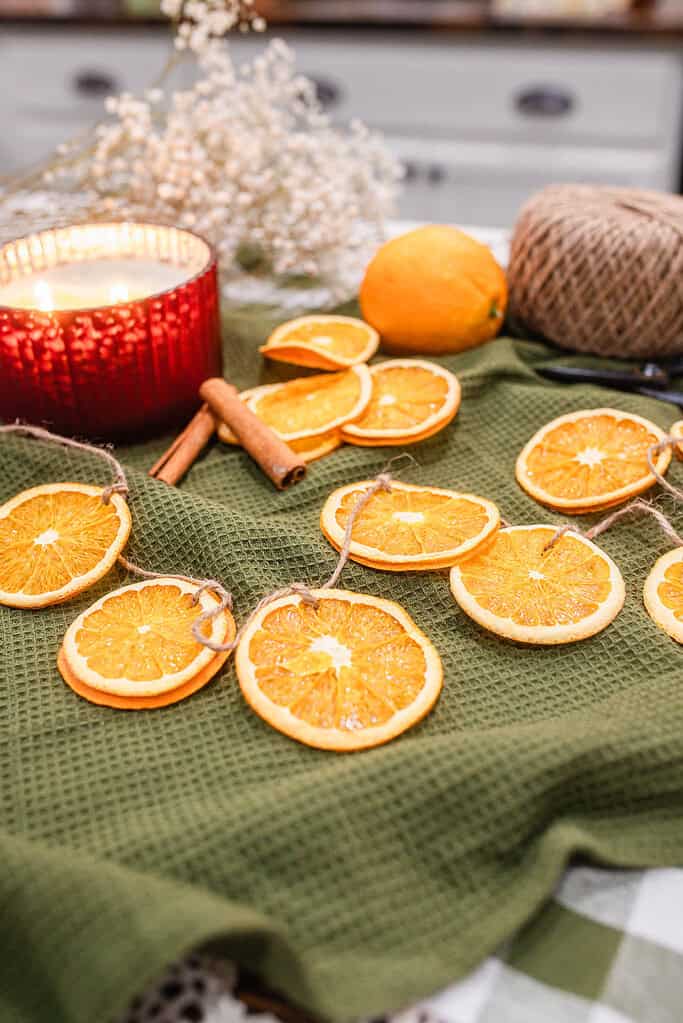
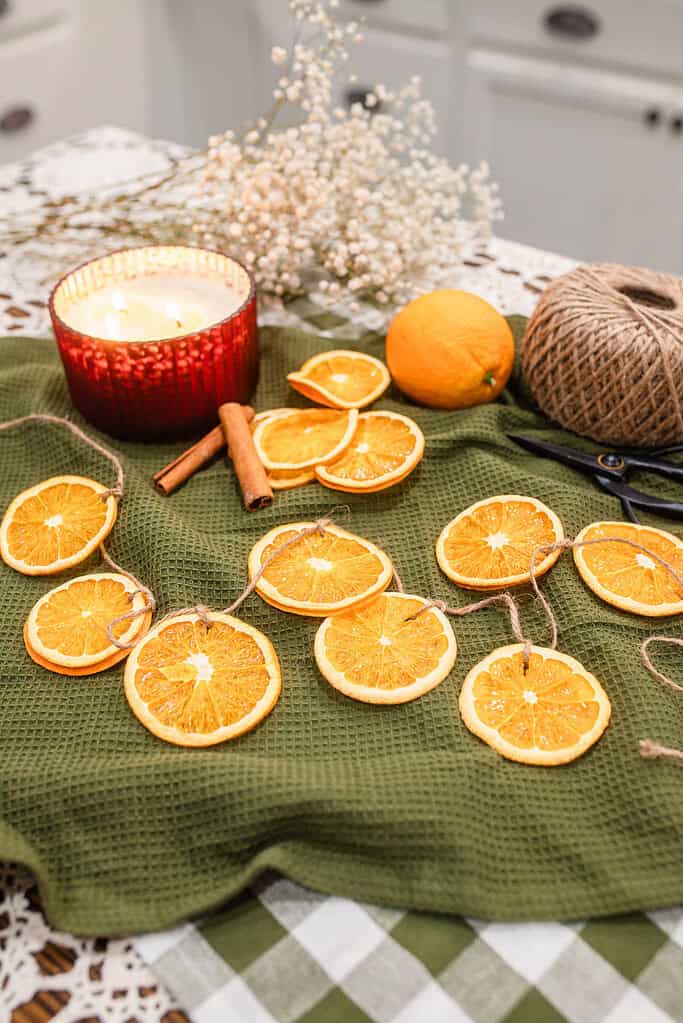
- Orange and spice garland: Add cinnamon sticks or bay leaves between orange slices for a warmer, more traditional holiday feel.
- Minimalist window garland: Hang a shorter garland in a kitchen or dining window using fishing line or thin string. The light coming through highlights the color without extra layers.
Styling Tips
Drape with intention: Hang the garland loosely over a fireplace mantel, open shelving, or a window frame so the slices can be seen individually. A relaxed drape keeps it from feeling stiff or overdone.
Mix with greenery: Pair the orange garland with fresh or faux greenery like cedar, pine, or eucalyptus. The contrast helps the orange color stand out while keeping the look natural.
Adjust spacing: Leave a little space between each orange slice when stringing the garland. This keeps the finished piece light and balanced instead of crowded.
Layer for depth: Use the garland alongside candles, wood tones, or simple holiday accents. Layering textures creates visual interest without adding clutter.
Project Tips
Use the lowest oven setting: Set your oven to the lowest temperature possible, ideally between 170–200°F. If your oven doesn’t go that low, use the keep warm setting, which usually holds closer to 125°F.
Let moisture escape: Prop the oven door open slightly using a wooden spoon or heat-safe utensil. This allows steam to escape, which helps the oranges dry instead of bake.
Remove excess moisture first: Before drying, press the orange slices between several layers of paper towels. Use three to four layers and gently press with your hands to absorb as much surface moisture as possible.
Flip often while drying: Turn the orange slices every 30–45 minutes. This helps moisture release evenly and prevents dark spots from forming.
Avoid high heat: Oranges darken when the temperature rises too high and the natural sugars begin to caramelize. Keeping the heat low slows this process and helps preserve the bright color.
Drying differences: A dehydrator works well because it removes moisture consistently without added heat. An oven can still work equally well, but only when moisture is released slowly, and the temperature stays very low.
How to Make a DIY Dried Orange Garland
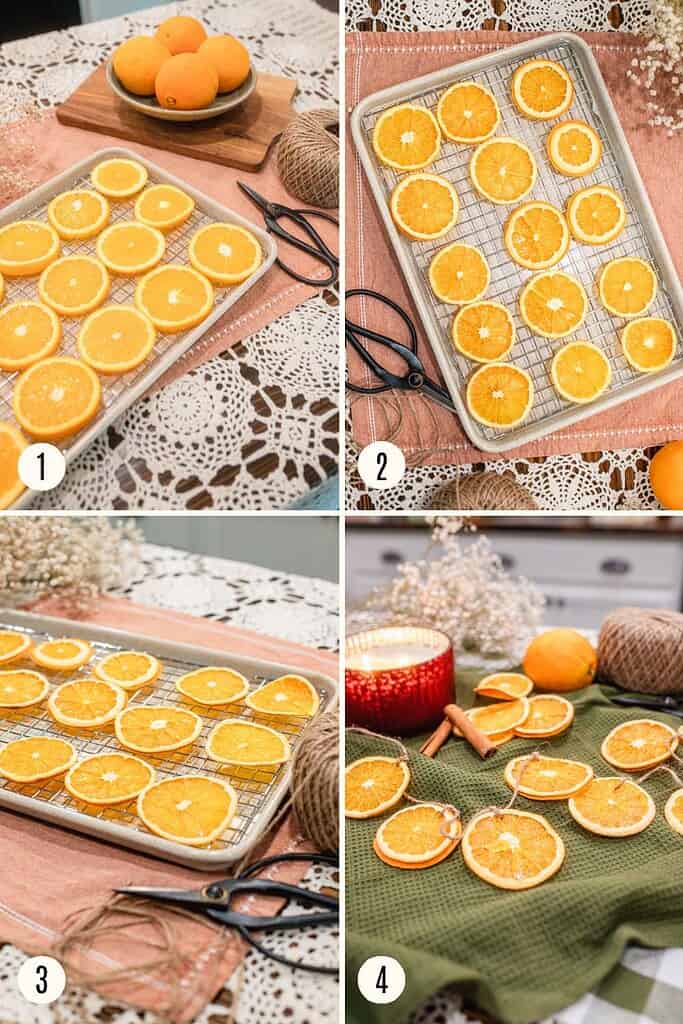
- Prepare your workspace: Preheat your oven to its lowest setting, usually between 170–200°F. Line a baking sheet with parchment paper and set out your cutting board, knife, and oranges so everything is within reach.
- Slice the oranges: Cut the oranges into thin, even slices, about 1/4 to 1/2 inch thick. Consistent thickness helps the slices dry evenly and prevents burning. Thicker slices are okay as long as you get as much moisture out of them as possible. Please read step #3 for details.
- Remove excess moisture first: Before drying, press the orange slices between several layers of paper towels. Use three to four layers and gently press with both hands with an orange slice sandwiched between the paper towels to absorb as much surface moisture as possible. This step is very important.
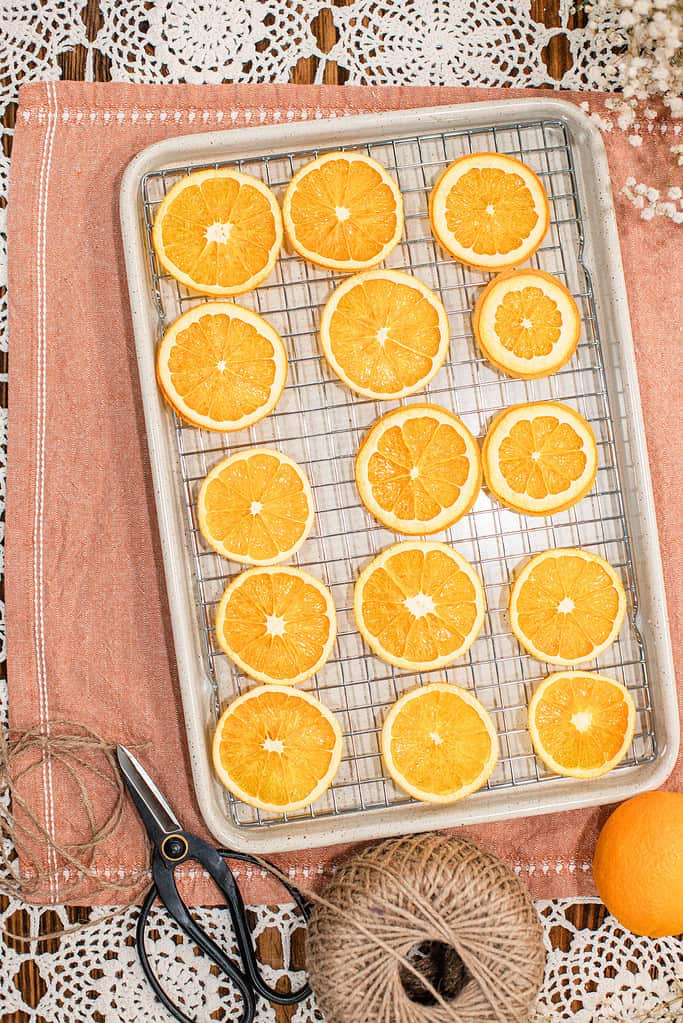
- Arrange on the baking sheet: Lay the orange slices flat on the parchment-lined baking sheet, making sure they don’t overlap. Proper spacing allows air to circulate and helps the slices dry fully.
- Dry the oranges: Place the baking sheet in the oven and let the oranges dry for 2–3 hours. Flip the slices every 30–45 minutes to ensure even drying. The oranges are done when they feel dry and slightly firm, with no sticky spots.
- Cool completely: Remove the dried orange slices from the oven and let them cool fully on the baking sheet. Cooling helps them firm up before stringing.
- String the garland: Thread twine or string through the center of each dried orange slice. Leave a small space between slices for a lighter, more balanced look.
- Secure and hang: Tie a knot at each end of the string once the garland reaches your desired length. Hang it on a mantel, window, shelf, or wherever you’d like to add natural seasonal decor.
Storage Tip’s
- Store completely dry: Make sure the orange slices are fully dry before storing. Any remaining moisture can cause stickiness or mold over time.
- Use breathable containers: Store the garland in a paper bag, cardboard box, or fabric bag. Avoid airtight plastic containers, which can trap moisture.
- Layer with parchment: Place parchment paper between loops of the garland to prevent sticking and color transfer.
- Keep in a cool space: Store the garland in a cool, dry area away from humidity, such as a closet or pantry shelf.
- Check before reuse: Before hanging the garland each season, check for softness, moisture, or mold. Discard any slices that don’t feel fully dry.
Troubleshooting
Slices turning too dark: This usually means the oven temperature is too high or moisture isn’t escaping. Lower the heat and prop the oven door open slightly.
Sticky orange slices: Sticky spots mean the oranges need more drying time. Return them to low heat and flip regularly until fully dry.
Uneven drying: Uneven thickness causes some slices to dry faster than others. Slice evenly and rotate the baking sheets during drying.
Mold during storage: Mold happens when oranges are stored with moisture present. Always cool and dry completely before storing.
Garland breaking: Thin string or overcrowding slices can cause breakage. Use sturdy twine and leave space between slices.
FAQ’s
More DIYs from The Cottage
- Cinnamon Applesauce Ornaments
- 3 DIY Christmas Candles | Easy Holiday Gift Tutorial
- Homemade Christmas Sugar Scrubs
- Cozy DIY Beeswax Candles in Thrifted Vintage Glass Jars
Join The Community
Want More Cozy Recipes & Seasonal Inspiration?
Get cozy, from-scratch recipes, seasonal cottage living tips, and slow living inspiration delivered straight to your inbox.
Thank you for welcoming me into your home as we create beauty in the everyday. May your spaces always feel cozy, lived-in, and loved.
With love & gratitude,
Emily
Dried Orange Garland
Supplies
- 1 Sharp knife
- 1 Oven
- 1 Baking sheet
- 1 Scissors
Elements
- 6-8 whole Oranges
- 1 bundle Twine or string
- 1 Cutting Board
- 1 roll Parchment paper
- 1 roll Paper towels
Instructions
- Prepare your workspace: Preheat your oven to its lowest setting, usually between 170–200°F. Line a baking sheet with parchment paper and set out your cutting board, knife, and oranges so everything is within reach.
- Slice the oranges: Cut the oranges into thin, even slices, about 1/4 to 1/2 inch thick. Consistent thickness helps the slices dry evenly and prevents burning. Thicker slices are okay as long as you get as much moisture out of them as possible. Please read step #3 for details.
- Remove excess moisture first: Before drying, press the orange slices between several layers of paper towels. Use three to four layers and gently press with both hands with an orange slice sandwiched between the paper towels to absorb as much surface moisture as possible. This step is very important.
- Arrange on the baking sheet: Lay the orange slices flat on the parchment-lined baking sheet, making sure they don’t overlap. Proper spacing allows air to circulate and helps the slices dry fully.
- Dry the oranges: Place the baking sheet in the oven and let the oranges dry for 2–3 hours. Flip the slices every 30–45 minutes to ensure even drying. The oranges are done when they feel dry and slightly firm, with no sticky spots.
- Cool completely: Remove the dried orange slices from the oven and let them cool fully on the baking sheet. Cooling helps them firm up before stringing.
- String the garland: Thread twine or string through the center of each dried orange slice. Leave a small space between slices for a lighter, more balanced look.
Video
Notes
Did you try this project?
If you gave this DIY a try and loved how it turned out, I’d be so grateful if you came back to leave a 5″⭐️” rating. Use the buttons below to share, comment, or connect—it truly brings me so much joy to see the beautiful things you’re creating.

Emily Rider
Cottage lifestyle blogger and home miller with 25+ years of sourdough and fresh-milled flour experience.
Sharing cozy homemade recipes that help you bake with confidence, celebrate each season, and savor the beauty of everyday cottage living.


So enjoy your post and so proud of you and Ruby..keep up the good work..love you Cuz..
Thank you so much Carol. We appreciate your kind words. Love you too!!!