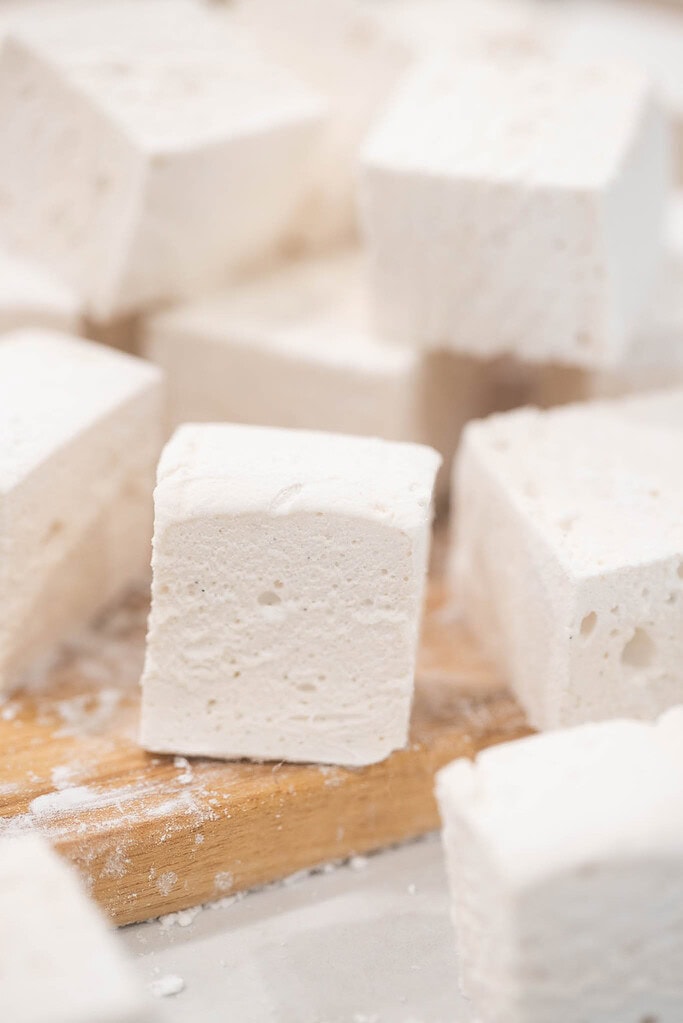
These homemade vanilla marshmallows make soft, pillowy squares with a warm vanilla flavor and a light, fluffy texture that holds its shape when cut, melts smoothly into hot cocoa, and toasts over an open flame with a golden exterior and a soft, gooey center.
The sugar syrup cooks to exactly 235°F before it goes into the bloomed gelatin, and the full 10 to 12 minutes of whipping on high speed is what builds the volume and stiff peaks that give the finished marshmallow its characteristic light, airy texture.
Stir them into a mug of Hot Cocoa Mix, float them on top of Creamy Crockpot Hot Chocolate, or add them to a warm Gingerbread Hot Chocolate for a cozy finishing touch.

Turned out perfectly! Thanks so much! ~Lorrie
Why You’ll Love This Recipe

Ingredients

Variations & Add-Ins
Recipe Tips
Measure and prep everything before starting – Candy making moves quickly once the sugar syrup begins boiling. Have the gelatin bloomed, the pan greased, and the vanilla and salt measured and ready before the syrup goes on the heat.
Use a candy thermometer for accuracy – The syrup needs to reach exactly 235°F, the soft-ball stage, before it is ready to pour. Pulling it too early produces marshmallows that will not set firmly, and going too far produces a stiff, grainy texture.
Do not stir the syrup once it begins boiling – Stirring after the sugar dissolves causes crystallization and produces a grainy finished marshmallow. Leave the syrup completely undisturbed from the moment it starts boiling until it reaches temperature.
Pour the hot syrup slowly – Add the hot syrup to the gelatin mixture in a slow, steady stream with the mixer running on low. Pouring too quickly can cause the gelatin to seize or the syrup to splash dangerously.
Whip until thick, white, and glossy – The mixture should increase significantly in volume and hold stiff, glossy peaks before transferring to the pan. Under-whipped marshmallows will be dense and flat rather than light and fluffy.
Grease the pan thoroughly – Coat the bottom and sides of the pan with coconut oil before pouring in the mixture. A properly greased pan allows the set slab to release cleanly without tearing or sticking.
Dust generously when cutting – Cover the cutting board, knife, and all cut sides with the cornstarch and powdered sugar mixture as you work. Skipping this step makes the marshmallows stick together and difficult to separate cleanly.
Store away from moisture – Humidity is the primary cause of sticky marshmallows after cutting. Keep them in a tightly sealed airtight container away from steam, open windows, or any source of moisture in the kitchen.


Instructions
- Bloom the gelatin – Pour ½ cup of cold water into the bowl of a stand mixer and sprinkle the powdered gelatin evenly over the surface. Let it sit for 5 minutes until the gelatin softens and absorbs the water completely.
- Prepare the pan – Grease an 8×8 inch baking pan with coconut oil, coating the bottom and all four sides thoroughly. Set aside while the syrup cooks.
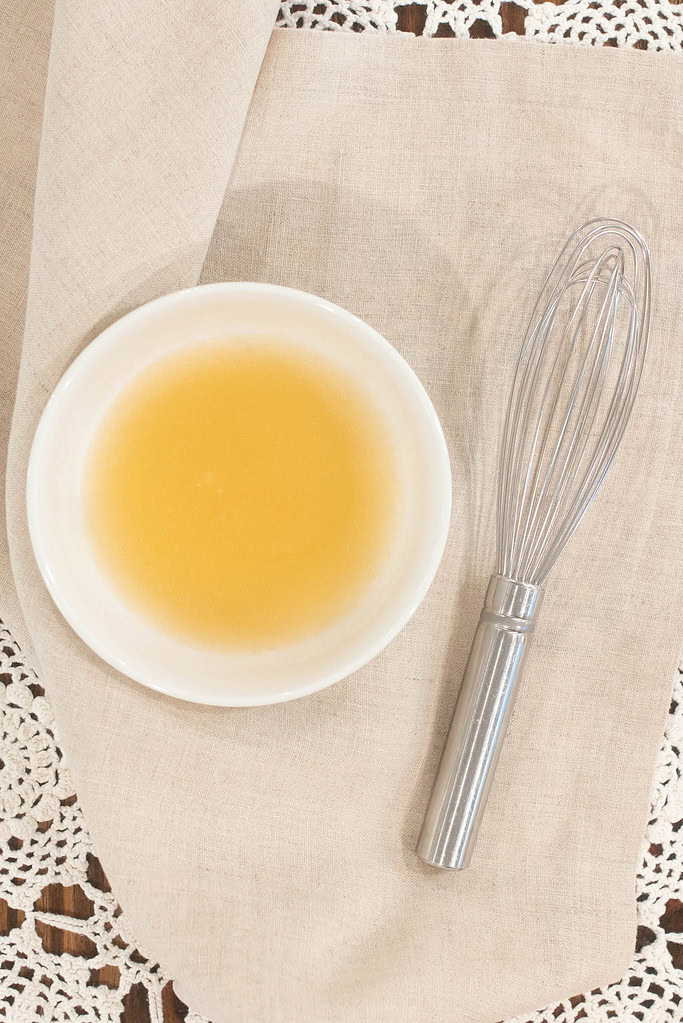
- Cook the sugar syrup – Combine the remaining ¼ cup of water, granulated sugar, and corn syrup in a medium saucepan. Heat over medium heat and stir until the sugar dissolves completely.
- Bring to temperature – Once the sugar dissolves, stop stirring and allow the syrup to boil undisturbed until it reaches 235°F on a candy thermometer. Do not stir at any point once boiling begins.
- Start the mixer – Fit the stand mixer with the whisk attachment and begin mixing the bloomed gelatin on low speed to loosen it slightly before the hot syrup goes in.
- Add the hot syrup – With the mixer running on low, slowly pour the hot syrup into the gelatin mixture in a thin, steady stream. Take your time — pouring too quickly can cause the gelatin to seize.
- Add vanilla and salt – Once the syrup is fully incorporated, pour in the vanilla extract and add the pinch of salt.
- Whip until fluffy – Increase the mixer speed to high and beat for 10 to 12 minutes until the mixture is thick, white, glossy, and holds stiff peaks. The volume should increase significantly during this time.
- Transfer to the pan – Pour the marshmallow mixture into the prepared pan and smooth the top with a lightly greased spatula. Cover with a greased piece of parchment paper pressed gently against the surface.
- Set overnight – Leave the marshmallows uncovered or loosely covered at room temperature for at least 6 hours or overnight. Do not refrigerate during this stage.
- Cut and coat – Dust a clean cutting board generously with the cornstarch and powdered sugar mixture. Turn the set marshmallow slab out onto the board and cut into squares using a sharp knife, pizza cutter, or kitchen shears. Toss the cut pieces in the dusting mixture to coat all sides.
- Store – Shake off any excess coating and transfer to an airtight container. Store at room temperature away from moisture for up to several weeks.
Gifting Ideas
Freezing & Storage
- Room temperature – Store fully coated marshmallows in an airtight container at room temperature for up to 2 weeks. Make sure every cut side is well dusted with the cornstarch and powdered sugar mixture before storing to prevent sticking between pieces.
- Avoid moisture – Humidity is the primary cause of sticky marshmallows after cutting. Keep the container tightly sealed and away from steam, open windows, or any source of moisture in the kitchen.
- Freezer – Place fully coated marshmallows in a freezer-safe container or bag with a sheet of parchment paper between layers to prevent sticking. Freeze for up to 3 months and bring to room temperature before using for the best texture.
- Refreshing sticky marshmallows – If the marshmallows become sticky during storage, toss them again in a fresh batch of the cornstarch and powdered sugar dusting mixture and allow them to air dry on a wire rack for 20 to 30 minutes before returning to the container.
FAQ
Join The Community
Want More Cozy Recipes & Seasonal Inspiration?
Get cozy, from-scratch recipes, seasonal cottage living tips, and slow living inspiration delivered straight to your inbox.
More Recipes from the Cottage


Homemade Vanilla Marshmallows Recipe
Equipment
- 1 8×8-inch baking pan
- 1 Medium saucepan
- 1 Stand mixer with whisk attachment
- 1 Candy Thermometer
Ingredients
- ¾ cup water divided, 180 milliliters
- 7 teaspoons powdered gelatin or 3 packets Knox gelatin
- 2 cups granulated sugar 400 grams
- ⅔ cup light corn syrup 220 grams
- 1 tablespoon vanilla extract 15 milliliters
- Pinch of salt
- ¼ cup cornstarch for dusting, 30 grams
- ¼ cup confectioners sugar for dusting, 30 grams
- Coconut oil for greasing the pan
Instructions
- Bloom the gelatin – Pour ½ cup of cold water into the bowl of a stand mixer and sprinkle the powdered gelatin evenly over the surface. Let it sit for 5 minutes until the gelatin softens and absorbs the water completely.
- Prepare the pan – Grease an 8×8 inch baking pan with coconut oil, coating the bottom and all four sides thoroughly. Set aside while the syrup cooks.
- Cook the sugar syrup – Combine the remaining ¼ cup of water, granulated sugar, and corn syrup in a medium saucepan. Heat over medium heat and stir until the sugar dissolves completely.
- Bring to temperature – Once the sugar dissolves, stop stirring and allow the syrup to boil undisturbed until it reaches 235°F on a candy thermometer. Do not stir at any point once boiling begins.
- Start the mixer – Fit the stand mixer with the whisk attachment and begin mixing the bloomed gelatin on low speed to loosen it slightly before the hot syrup goes in.
- Add the hot syrup – With the mixer running on low, slowly pour the hot syrup into the gelatin mixture in a thin, steady stream. Take your time — pouring too quickly can cause the gelatin to seize.
- Add vanilla and salt – Once the syrup is fully incorporated, pour in the vanilla extract and add the pinch of salt.
- Whip until fluffy – Increase the mixer speed to high and beat for 10 to 12 minutes until the mixture is thick, white, glossy, and holds stiff peaks. The volume should increase significantly during this time.
- Transfer to the pan – Pour the marshmallow mixture into the prepared pan and smooth the top with a lightly greased spatula. Cover with a greased piece of parchment paper pressed gently against the surface.
- Set overnight – Leave the marshmallows at room temperature for at least 6 hours or overnight. Do not refrigerate during this stage.
- Cut and coat – Dust a clean cutting board generously with the cornstarch and powdered sugar mixture. Turn the set marshmallow slab out onto the board and cut into squares using a sharp knife, pizza cutter, or kitchen shears. Toss the cut pieces in the dusting mixture to coat all sides.
- Store – Shake off any excess coating and transfer to an airtight container. Store at room temperature away from moisture for up to 2 weeks.
Video
Notes

Emily Rider
Home miller since 1999 with fresh-milled flour & sourdough experience. Sharing from-scratch recipes and traditional kitchen skills, rooted in the seasons and inspired by everyday cottage living and seasonal rhythms.
Turned out perfectly! Thanks so much!
Lorrie, thank you so much for letting me know! I’m so glad it turned out perfectly for you. That’s always my hope when I share a recipe here — that it works beautifully in your kitchen too.
I really appreciate you taking the time to leave a review. It means a lot to me.
Warmly,
Emily