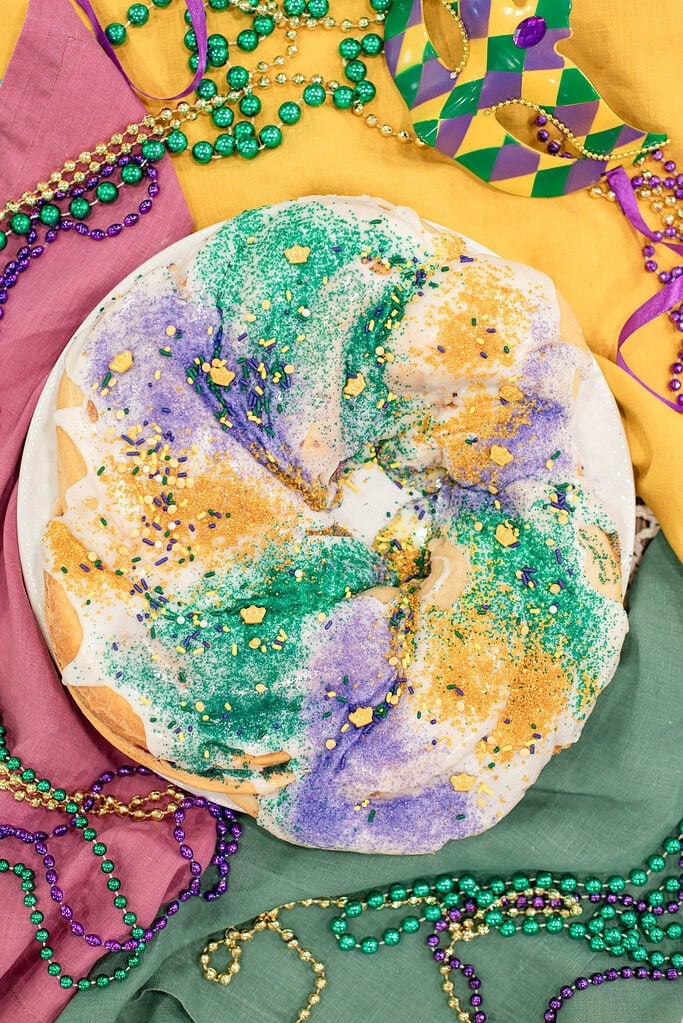
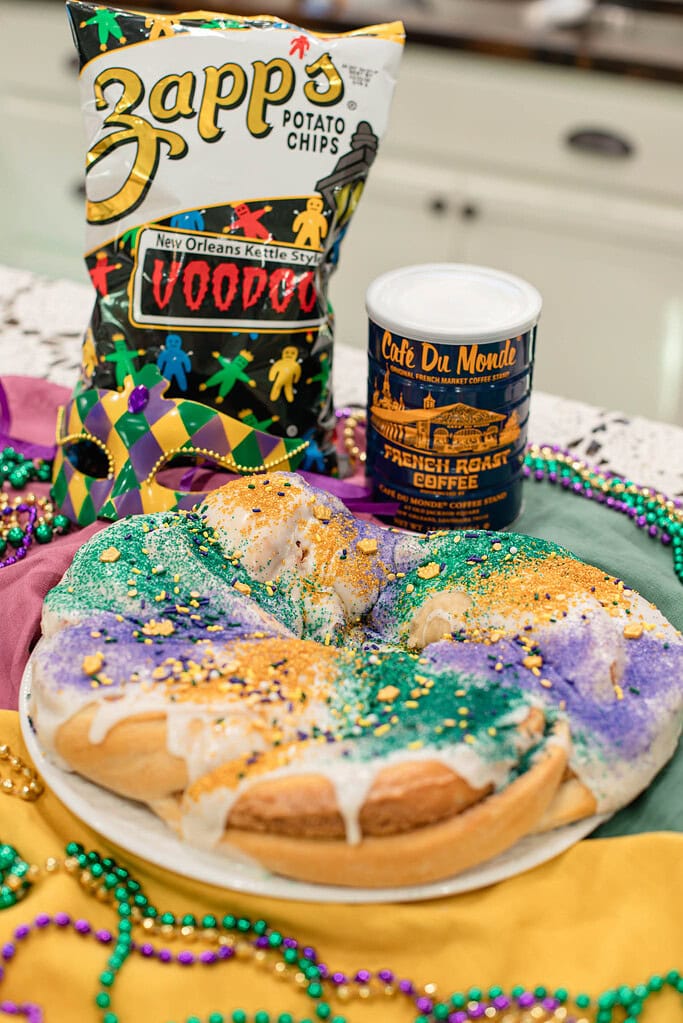
This sourdough king cake recipe builds a babka-style braided brioche with a cinnamon cream cheese filling, soft buttery crumb, and golden edges where the layers open during baking.
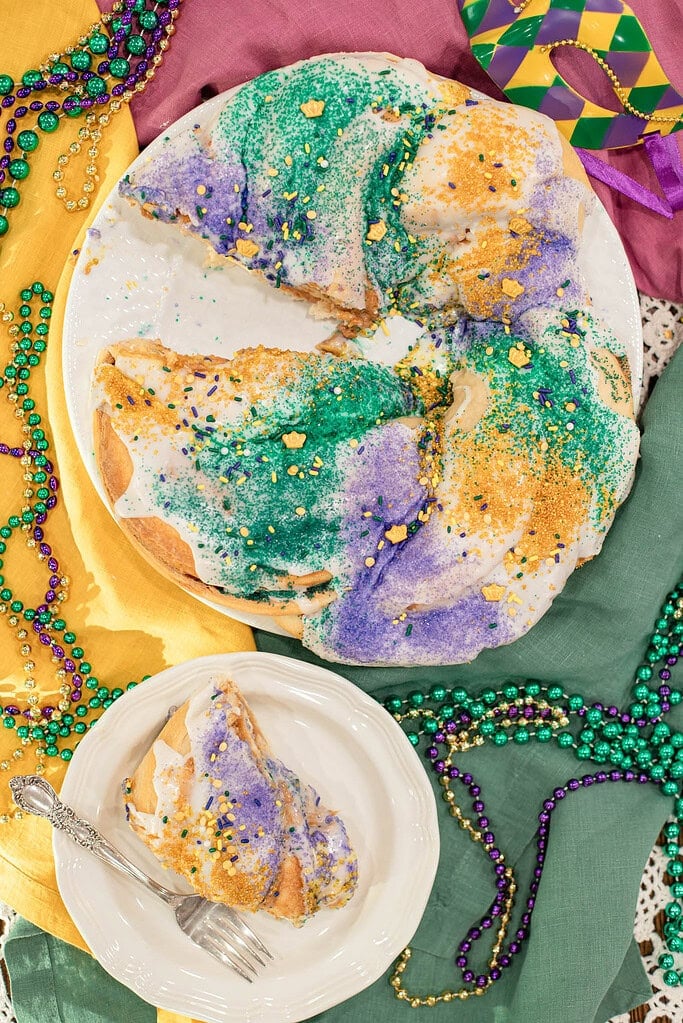
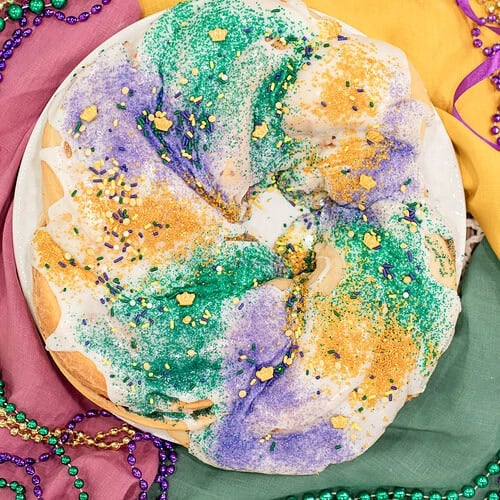
It is finished with a white glaze and purple, green, and gold sanding sugars — the traditional Mardi Gras colors — and can be served warm with strong coffee or chicory café au lait.
If you are planning a full Mardi Gras spread, you might also enjoy Sourdough Beignets, Creamy Crawfish and Shrimp Étouffée Recipe, and Authentic New Orleans Red Beans & Rice Recipe.
Taste is amazing, so tender inside! I am guessing that is from the “open baking” style. The glaze and sprinkles did make the outside beautiful and festive! ~Sarah
Did you know you can convert your recipes to freshly milled flour? I share how to convert your recipes and more at The Cottage Mill.
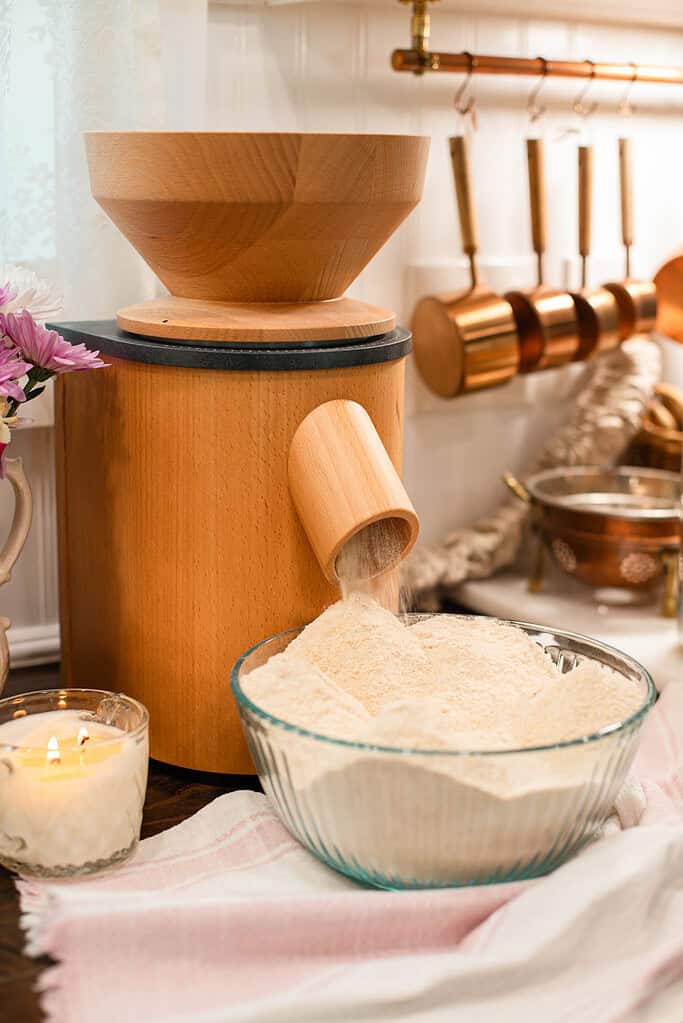
Step into The Cottage Mill: Freshly Milled Flour Guides, Recipes, and More Await!
Why You’ll Love This Recipe
Ingredients
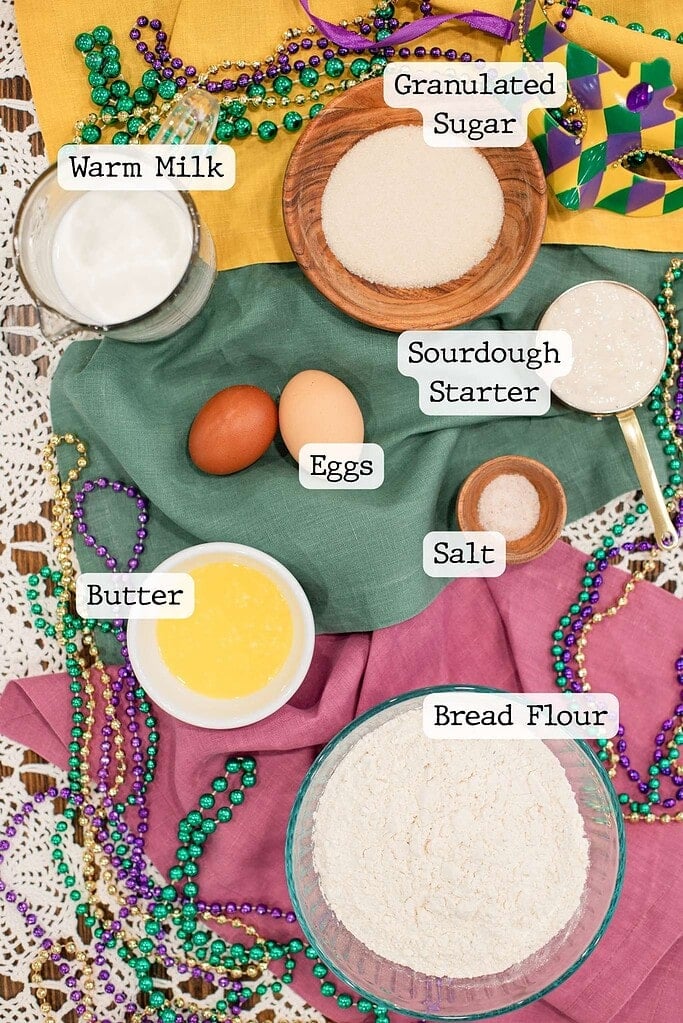
For the Dough
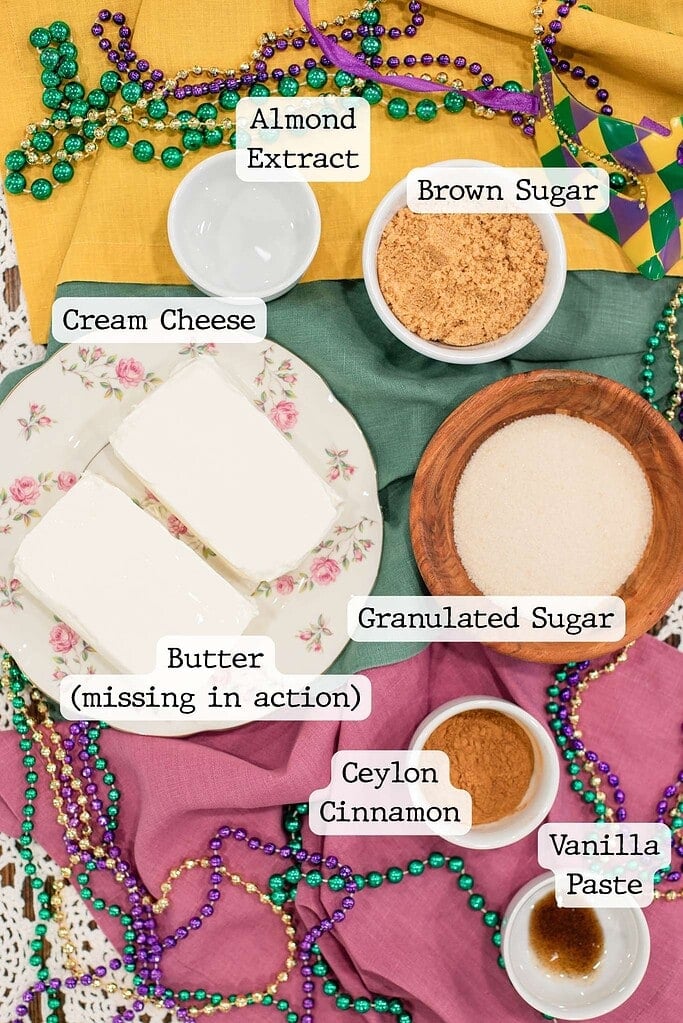
For the Filling
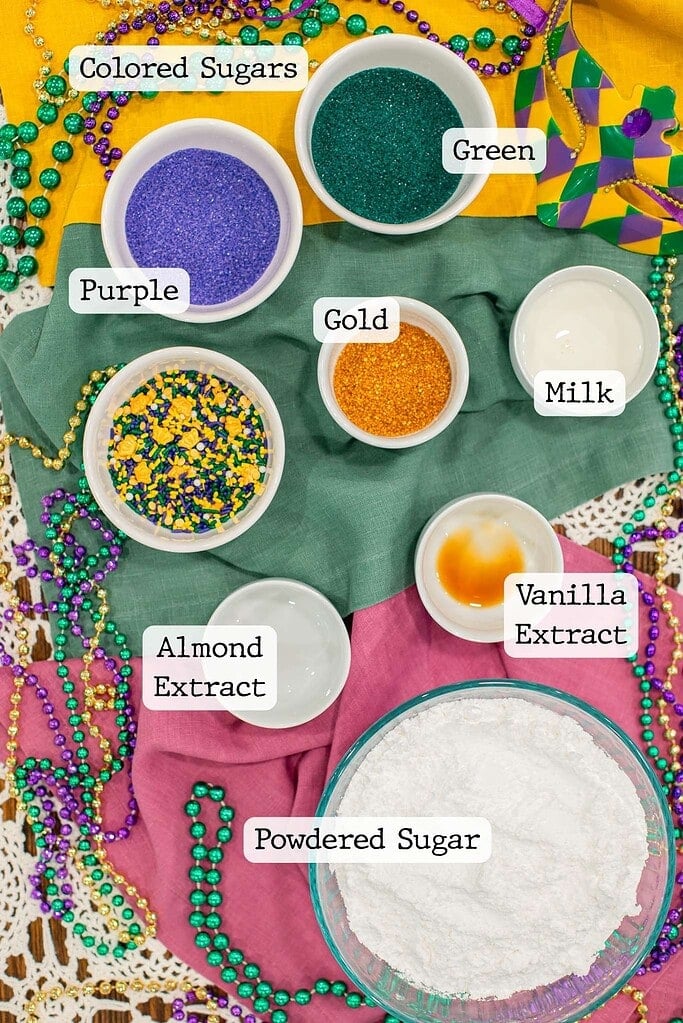
For the Glaze
Variations & Add-Ins
Recipe Tips
Use your starter at peak activity – Feed your starter 4 to 6 hours before mixing and wait until it has domed and is visibly bubbly. Enriched doughs ferment more slowly than lean sourdough, so a strong active starter makes a noticeable difference in the final rise.
Warm the milk to the right temperature – Heat the milk to around 90 to 95°F, warm enough to feel comfortable on the wrist but not hot. Milk that is too warm can weaken the starter, and milk that is too cool will make the dough sluggish from the start.
Keep the dough soft – This dough is supposed to feel soft and slightly tacky because of the butter, eggs, and sugar. If the dough is sticking to your hands, rub them lightly with oil rather than adding more flour.
Chill the dough before shaping – After bulk fermentation, refrigerate the dough for 20 to 30 minutes before rolling. Cold dough rolls out cleaner and holds the braid shape better through twisting and forming.
Soften the butter and cream cheese fully – Both need to be at room temperature before mixing the filling or it will not spread smoothly and will tear the dough. Pull them out at least an hour before you plan to fill the cake.
Check doneness with a thermometer – The outside gets deep golden before the center is fully baked. Insert an instant-read thermometer into the thickest part of the ring and pull it when it reads 190°F.
Cool completely before glazing – Give the cake at least 45 minutes to an hour on a wire rack before glazing so it sets on top with a smooth white finish rather than melting into the crumb.
Watch the fermentation, not the clock – Look for 30 to 50 percent growth and a dough that feels airy and slightly domed. Enriched doughs can take anywhere from 4 to 8 hours depending on starter strength and kitchen temperature.
Instructions
- Mix the dough – Combine the active sourdough starter, warm milk, melted butter, granulated sugar, eggs, and salt in a large bowl or stand mixer and mix until smooth. Add the bread flour gradually and mix until a soft, slightly tacky dough forms with no dry flour remaining.
- Develop the gluten – Knead the dough by hand for 8 to 10 minutes, or mix on medium speed in a stand mixer for 6 to 8 minutes, until the dough is smooth, elastic, and pulls away cleanly from the sides of the bowl.
- Bulk ferment the dough – Cover the bowl and let the dough ferment at room temperature until it has grown by 30 to 50%. This typically takes 4 to 8 hours depending on the strength of your starter and the temperature of your kitchen. Watch the dough, not the clock.
- Chill before shaping – Once bulk fermentation is complete, refrigerate the dough for 20 to 30 minutes. Cold dough rolls out cleaner and holds the braid shape better through twisting and forming.
- Roll out the dough – Turn the dough onto a lightly floured surface and roll into a 12 by 18 inch rectangle, keeping the thickness as even as possible from edge to edge for a uniform bake.
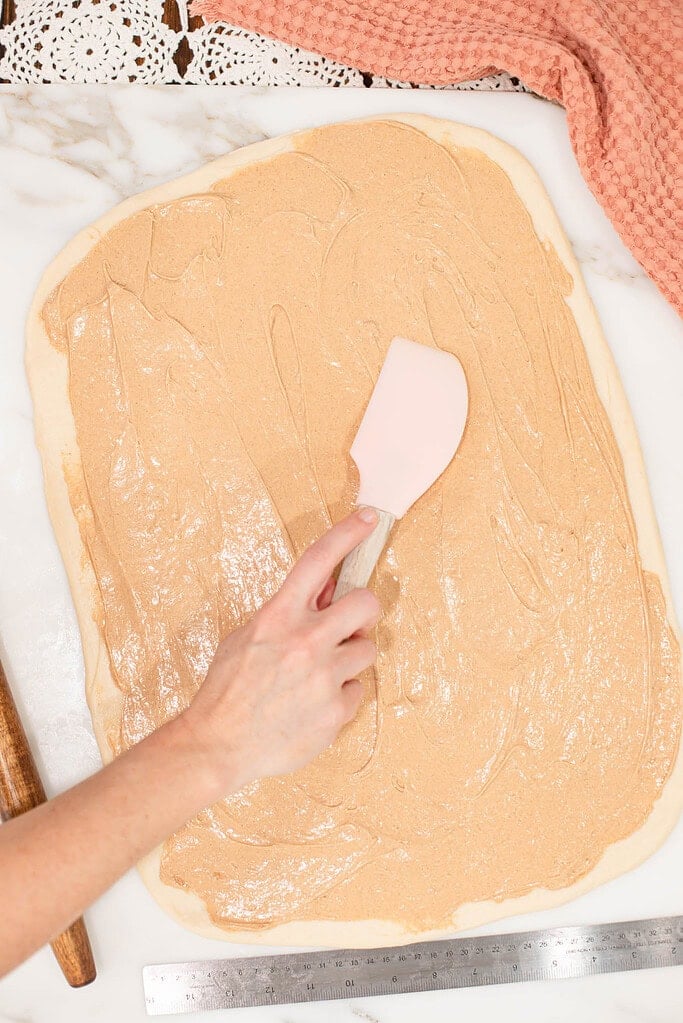
- Make the filling – Stir together the brown sugar, granulated sugar, and Ceylon cinnamon, then blend in the softened butter and almond extract until smooth. Mix in the fully softened cream cheese until creamy and easy to spread.
- Spread the filling – Spread the filling evenly over the rolled dough, leaving a 1 inch border around all edges. Use light, even pressure so the filling covers the surface without tearing the dough.
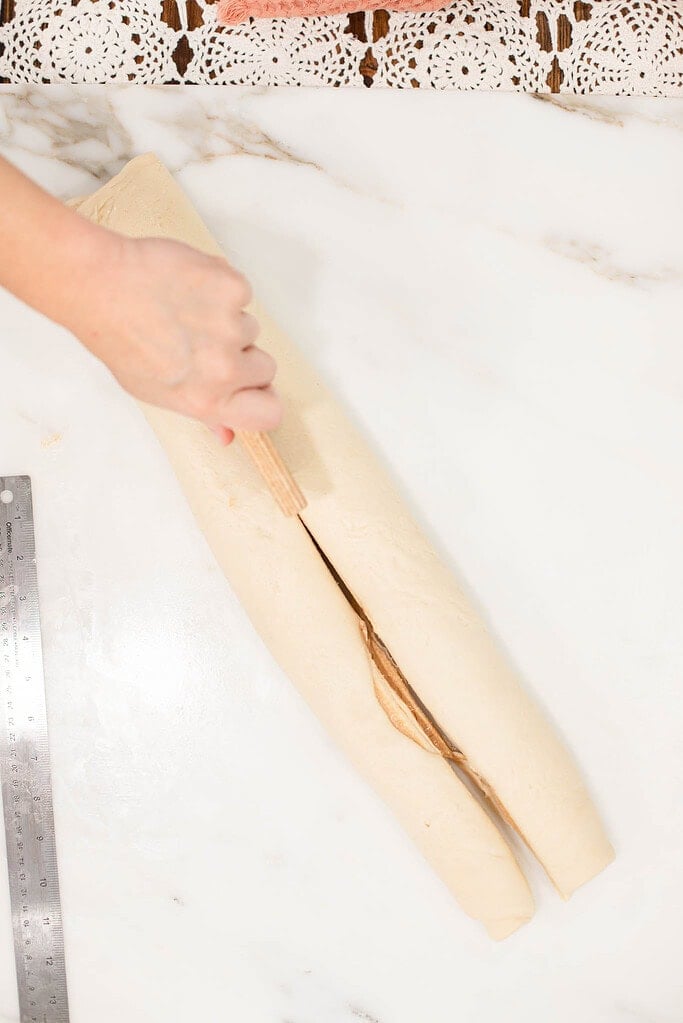
- Roll into a log – Starting from the long edge, roll the dough tightly and evenly into a log. Place it seam side down on your work surface so it holds its shape while you prepare to slice.
- Slice lengthwise – Using a sharp knife or bench scraper, cut the log lengthwise all the way through from one end to the other with a clean, confident cut that fully exposes the layers of filling inside.
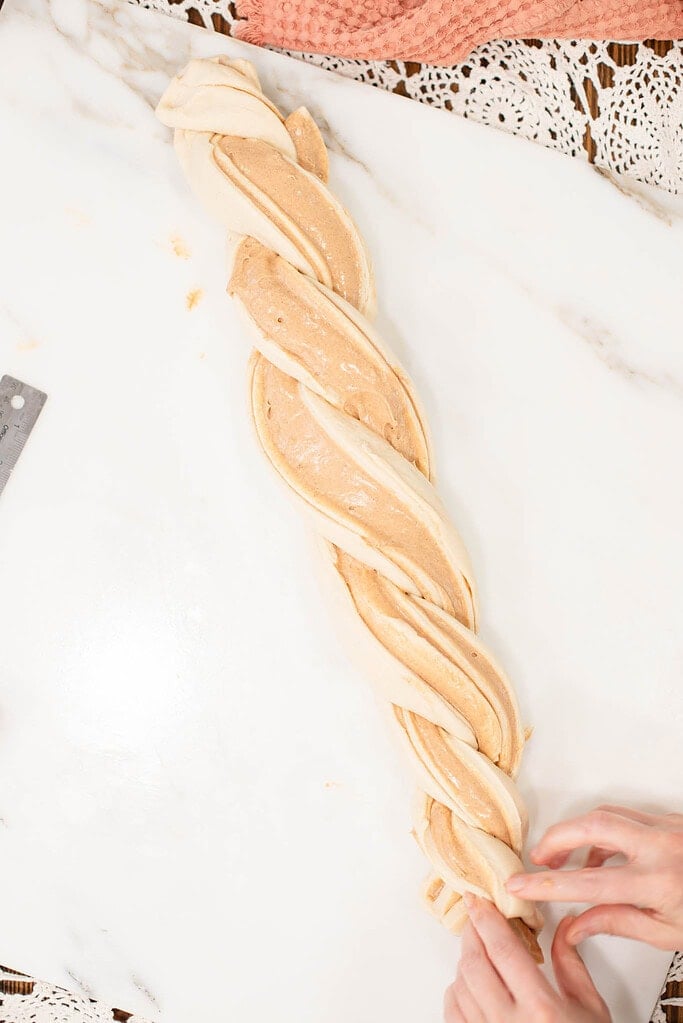
- Twist into a braid – Turn both halves cut side up so the filling faces upward. Gently twist the two pieces around each other, keeping the exposed filling on top throughout so the lacy edges form during baking.
- Shape into a ring – Transfer the twisted braid to a parchment lined baking sheet and curve it into a ring. Press the ends together firmly to seal so the ring holds its shape in the oven.
- Final rise – Cover the ring loosely and let it rest for about 30 minutes while you preheat the oven to 350°F. It will not double in size but should feel slightly lighter and puffier when gently pressed with a fingertip.
- Bake until golden – Bake for 30 to 40 minutes until deeply golden all over and the internal temperature reads 190°F on an instant-read thermometer. The filling should be bubbling at the edges and the center should feel set when pressed.
- Make the glaze – Whisk together the powdered sugar, milk, vanilla extract, and almond extract until smooth and pourable. The glaze should ribbon off the whisk but still have enough body to set on top of the cake rather than soaking in.
- Glaze and decorate – Let the cake cool completely on a wire rack, at least 45 minutes to an hour, before glazing. Drizzle the glaze generously over the cooled cake, then immediately sprinkle with purple, green, and gold sanding sugars so they adhere before the glaze sets. Insert the king cake baby from the bottom once everything has set if using, and serve warm or at room temperature.
Gifting Ideas
Freezing & Storage
- Room temperature. Store the fully cooled, glazed king cake loosely covered with plastic wrap or a clean kitchen towel at room temperature for up to 2 days. Keep it away from direct sunlight or heat sources to maintain a soft crumb.
- Refrigerator. Wrap the cake tightly or transfer to an airtight container and refrigerate for up to 5 days. The cream cheese filling means this cake does better in the refrigerator after the first couple of days. Let slices come to room temperature for 15 to 20 minutes before serving for the best crumb texture.
- Freezer. Wrap the unglazed cake or individual slices tightly in plastic wrap, place in a freezer-safe bag, and freeze for up to 2 months. Freeze before glazing when possible as the sanding sugars can bleed color and the glaze loses its finish after thawing.
- Thawing. Thaw frozen slices overnight in the refrigerator or at room temperature for about an hour. Add the glaze and sanding sugars fresh after thawing for the best presentation.
- Reheating. Warm individual slices in a 300°F oven for 8 to 10 minutes, or microwave in 20 second intervals until just heated through. Avoid overheating as this dries out the crumb and melts any glaze that has already set.
FAQ
Join The Community
Want More Cozy Recipes & Seasonal Inspiration?
Get cozy, from-scratch recipes, seasonal cottage living tips, and slow living inspiration delivered straight to your inbox.
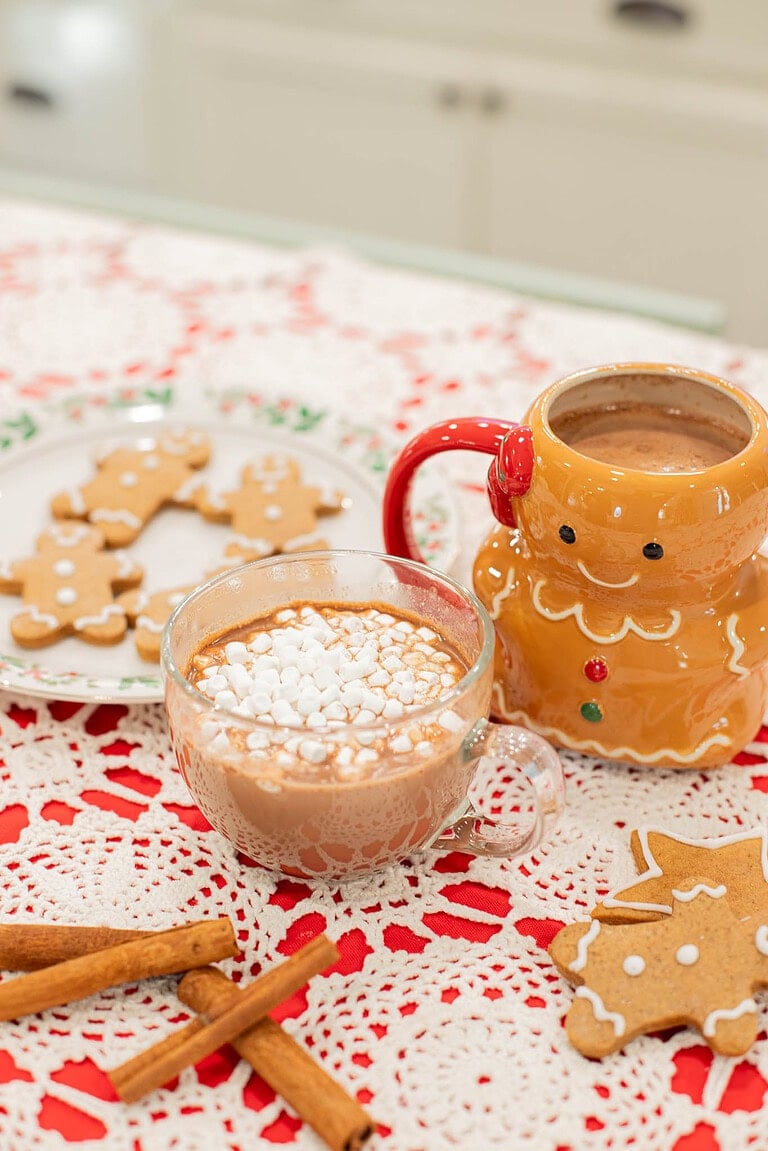
More Mardi Gras Recipes from the Cottage
Did you make this recipe?
Rate it 5 “⭐️” below.
If you liked this recipe, I’d be so grateful if you would share it with others. Use the buttons below to share, comment, or connect.

Sourdough King Cake Recipe
Equipment
- 1 Large mixing bowl or stand mixer
- 1 Rolling Pin
- 1 Sharp knife or bench scraper
- 1 Parchment lined baking sheet
- 1 Instant read thermometer
- 1 Wire rack
- 1 Small Mixing Bowl
- 1 Whisk
Ingredients
For the Dough
- 1 cup active sourdough starter at peak activity, 240 grams
- ¾ cup warm milk 90 to 95°F, 180 grams
- ¼ cup melted butter 57 grams
- ¼ cup granulated sugar 50 grams
- 1 teaspoon salt 6 grams
- 2 large eggs room temperature, 100 grams
- 3½ cups bread flour 420 grams
For the Filling
- ½ cup brown sugar packed, 110 grams
- 2 tablespoons granulated sugar 25 grams
- 2 teaspoons Ceylon cinnamon 5 grams
- 3 tablespoons butter softened, 42 grams
- 1 teaspoon almond extract 4 grams
- 8 ounces cream cheese fully softened, 226 grams
For the Glaze
- 1½ cups powdered sugar 180 grams
- 2 to 3 tablespoons milk 30 to 45 grams
- ½ teaspoon vanilla extract 2 grams
- ¼ teaspoon almond extract 1 gram
- Purple, green, and gold sanding sugars, for decorating
Instructions
- Mix the dough – Combine the active sourdough starter, warm milk, melted butter, granulated sugar, eggs, and salt in a large bowl or stand mixer and mix until smooth. Add the bread flour gradually and mix until a soft, slightly tacky dough forms with no dry flour remaining.
- Develop the gluten – Knead the dough by hand for 8 to 10 minutes, or mix on medium speed in a stand mixer for 6 to 8 minutes, until the dough is smooth, elastic, and pulls away cleanly from the sides of the bowl.
- Bulk ferment the dough – Cover the bowl and let the dough ferment at room temperature until it has grown by 30 to 50%. This typically takes 4 to 8 hours depending on the strength of your starter and the temperature of your kitchen. Watch the dough, not the clock.
- Chill before shaping – Once bulk fermentation is complete, refrigerate the dough for 20 to 30 minutes. Cold dough rolls out cleaner and holds the braid shape better through twisting and forming.
- Roll out the dough – Turn the dough onto a lightly floured surface and roll into a 12 by 18 inch rectangle, keeping the thickness as even as possible from edge to edge for a uniform bake.
- Make the filling – Stir together the brown sugar, granulated sugar, and Ceylon cinnamon, then blend in the softened butter and almond extract until smooth. Mix in the fully softened cream cheese until creamy and easy to spread.
- Spread the filling – Spread the filling evenly over the rolled dough, leaving a 1 inch border around all edges. Use light, even pressure so the filling covers the surface without tearing the dough.
- Roll into a log – Starting from the long edge, roll the dough tightly and evenly into a log. Place it seam side down on your work surface so it holds its shape while you prepare to slice.
- Slice lengthwise – Using a sharp knife or bench scraper, cut the log lengthwise all the way through from one end to the other with a clean, confident cut that fully exposes the layers of filling inside.
- Twist into a braid – Turn both halves cut side up so the filling faces upward. Gently twist the two pieces around each other, keeping the exposed filling on top throughout so the lacy edges form during baking.
- Shape into a ring – Transfer the twisted braid to a parchment lined baking sheet and curve it into a ring. Press the ends together firmly to seal so the ring holds its shape in the oven.
- Final rise – Cover the ring loosely and let it rest for about 30 minutes while you preheat the oven to 350°F. It will not double in size but should feel slightly lighter and puffier when gently pressed with a fingertip.
- Bake until golden – Bake for 30 to 40 minutes until deeply golden all over and the internal temperature reads 190°F on an instant-read thermometer. The filling should be bubbling at the edges and the center should feel set when pressed.
- Make the glaze – Whisk together the powdered sugar, milk, vanilla extract, and almond extract until smooth and pourable. The glaze should ribbon off the whisk but still have enough body to set on top of the cake rather than soaking in.
- Glaze and decorate – Let the cake cool completely on a wire rack, at least 45 minutes to an hour, before glazing. Drizzle the glaze generously over the cooled cake, then immediately sprinkle with purple, green, and gold sanding sugars so they adhere before the glaze sets. Insert the king cake baby from the bottom once everything has set if using, and serve warm or at room temperature.
Notes
Nutrition

Emily Rider
Home miller since 1999 with fresh-milled flour & sourdough experience. Sharing from-scratch recipes and traditional kitchen skills, rooted in the seasons and inspired by everyday cottage living and seasonal rhythms.


Can this recipe be done with gluten free starter and flour? I made it yesterday with this recipe step by step and it’s fabulous! Now I want to try gluten free. Thanks!
Hi Reagan,
I’m so glad you loved the recipe—thank you for coming back to let me know!
I want to be upfront and say I haven’t personally tested this King Cake with a gluten-free sourdough starter yet. That said, if I were going to try it, this is the approach I would take:
I’d use a 1:1 gluten-free baking flour that already contains xanthan gum, and expect the dough to behave more like a thick batter rather than a stretchy, kneadable dough. Gluten-free sourdough doesn’t develop structure the same way, so I’d focus more on consistency than kneading.
I’d also shorten the fermentation time and watch the dough instead of the clock—you’re looking for it to look slightly puffy and aerated, not doubled. The flavor should still be wonderful, just with a different texture than the traditional version.
If you decide to experiment with it, I’d love to hear how it turns out.
Warmly,
Emily
Thank you so much for the advice. I’m just seeing it now so it won’t be in time for Mardi Gras but I will certainly give it a shot and keep you posted.
Hi Reagan,
Your very welcome!
I hope you have a wonderful Mardi Gras celebration. If you get to try it next year gluten free please let me know.
Warmly,
Emily
Making this now! I wonder if I made a mistake or missed a step. Because since I had the cut sides up for braiding, it looks like the filling is all oozing out 😒 thoughts?
Dear Sarah,
You didn’t miss a step at all. The filling is meant to be exposed, similar to a babka. When you slice the log lengthwise and turn the cut sides upward, some of the filling will show, and that’s exactly how it should look.
This shaping method allows the dough and filling to bake evenly while creating that twisted presentation on top. It may look different from a fully enclosed king cake, but it’s intentional.
Once baked and cooled, the glaze and sprinkles go right over the top, softening the look and creating the finished presentation shown in the photos.
I’ll add an additional process photo soon to make that step even clearer.
Warmly,
Emily
Dear Sarah,
I have updated the post to include more photos to show you what the final cake shape and filling exposed or “oozing out” should look like. I hope these photos help you. This king cake dough babka-style braid is done for three very good reasons. To allow the dough to cook thoroughly without becoming dry and hard, and for flavor and visual appeal.
Warmly,
Emily
Thank you so much!!! Super helpful! Appreciate it!
Your very welcome:)!
Thanks again! Taste is amazing, so tender inside! I am guessing that is from the “open baking” style. Then glaze and sprinkles did make the outside beautiful and festive!
Hi Sarah, thank you so much for letting me know how your cake turned out. I’m so glad you loved it! Yes, that open baking method really helps create a tender crumb.
You can use the same technique with this Sourdough Cinnamon Rolls Recipe for that same soft result. Cooking really is a little bit of science — once you learn a few simple cooking tricks, it opens up so many possibilities in the kitchen. 😊
I’m so happy it turned out beautifully for you! Happy Mardi Gras!
Warmly,
Emily