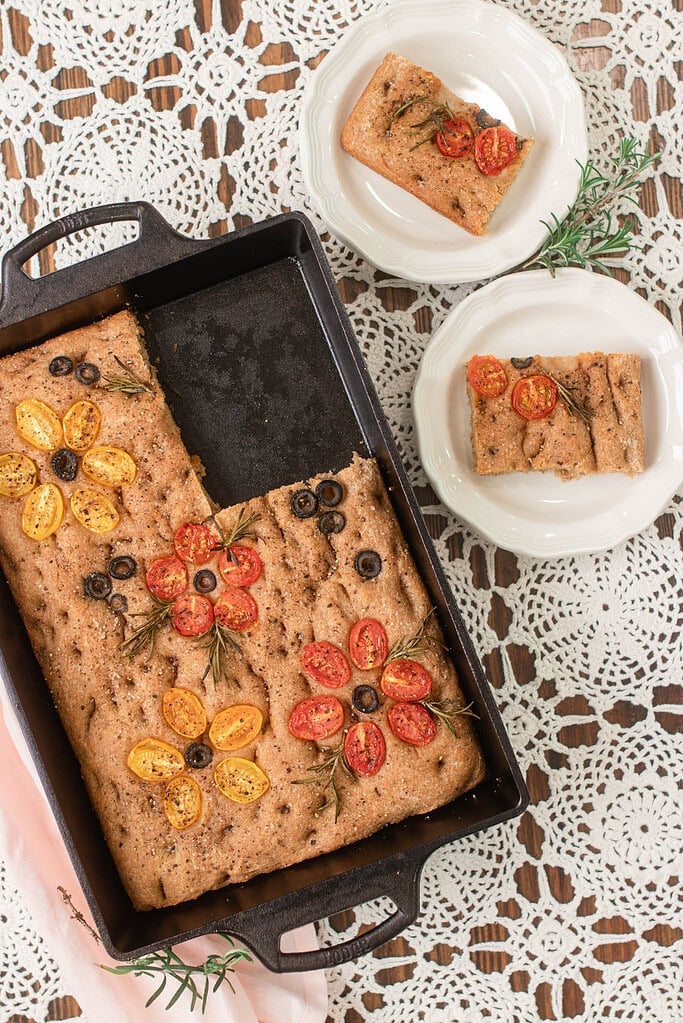
This sourdough focaccia with freshly milled flour bakes up with crispy golden edges, a pillowy open crumb, and a depth of whole grain flavor that makes every slice worth the wait.
Hard white wheat keeps the dough mild and workable without the heaviness of red wheat, and the long fermentation builds a gentle tang that pairs beautifully with good olive oil and flaky sea salt.
If you are new to milling your own flour, Mill Your Own Flour at Home walks through the full process, Best Whole Grains to Mill covers which wheat works best for bread, and Baking Sourdough with Freshly Milled Flour covers the key adjustments.
Did you know you can convert your recipes to freshly milled flour? I share how to convert your recipes and more at The Cottage Mill.
Step into The Cottage Mill: Freshly Milled Flour Guides, Recipes, and More Await!
Why You’ll Love This Recipe
Ingredients
Variations & Add-Ins
Recipe Tips
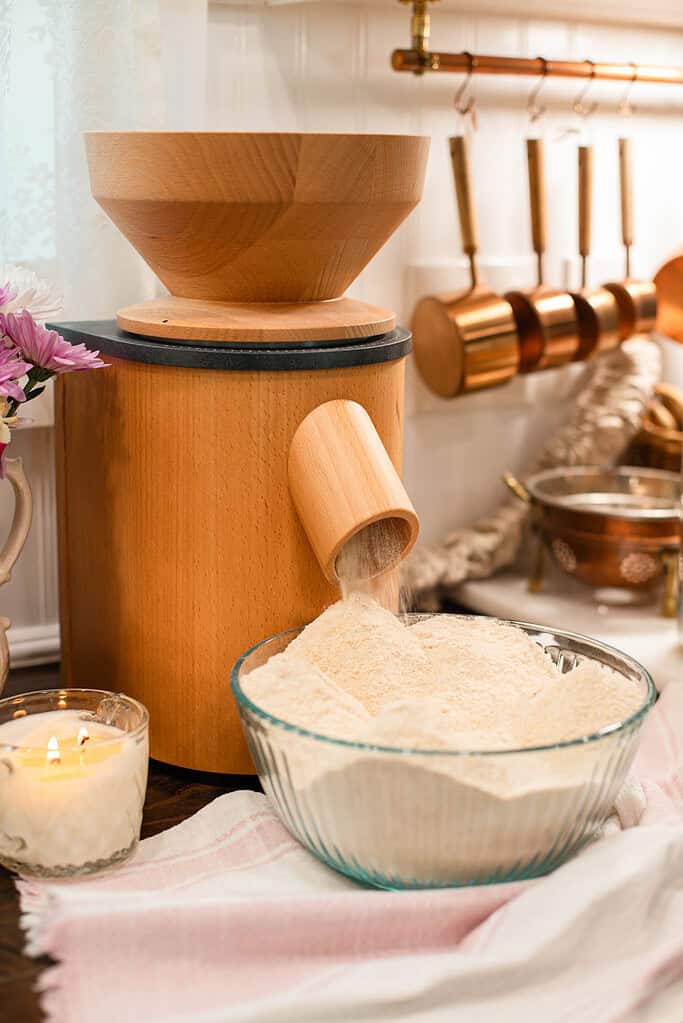
Mill your flour the same day you mix – fresh milled flour performs best within 24 hours of milling when the enzymes are most active and the oils in the germ are at their brightest. Same-day milling gives you the most responsive dough and the deepest flavor in the finished loaf.
Feed your starter four to six hours before mixing – an active, bubbly starter at peak rise is what drives fermentation in this dough. A sluggish starter leads to a dense, under-risen focaccia that no amount of extra time will fully correct.
Add water gradually and let the dough rest – fresh milled flour continues absorbing water as the bran hydrates, so resist the urge to add more liquid immediately if the dough feels stiff. Give it a 20 to 30 minute rest after the initial mix before deciding whether it needs more water.
Watch the dough, not the clock – bulk fermentation with fresh milled flour moves faster than standard recipes expect. Look for a 50 to 75 percent rise, bubbles visible at the edges of the container, and a dough surface that has smoothed out and domed slightly.
Oil the pan generously before the dough goes in – at least 2 tablespoons of extra virgin olive oil across the bottom of a 9×13 inch pan creates the crispy, lacy edges that define a well-made focaccia. Too little oil produces a pale, soft bottom that sticks.
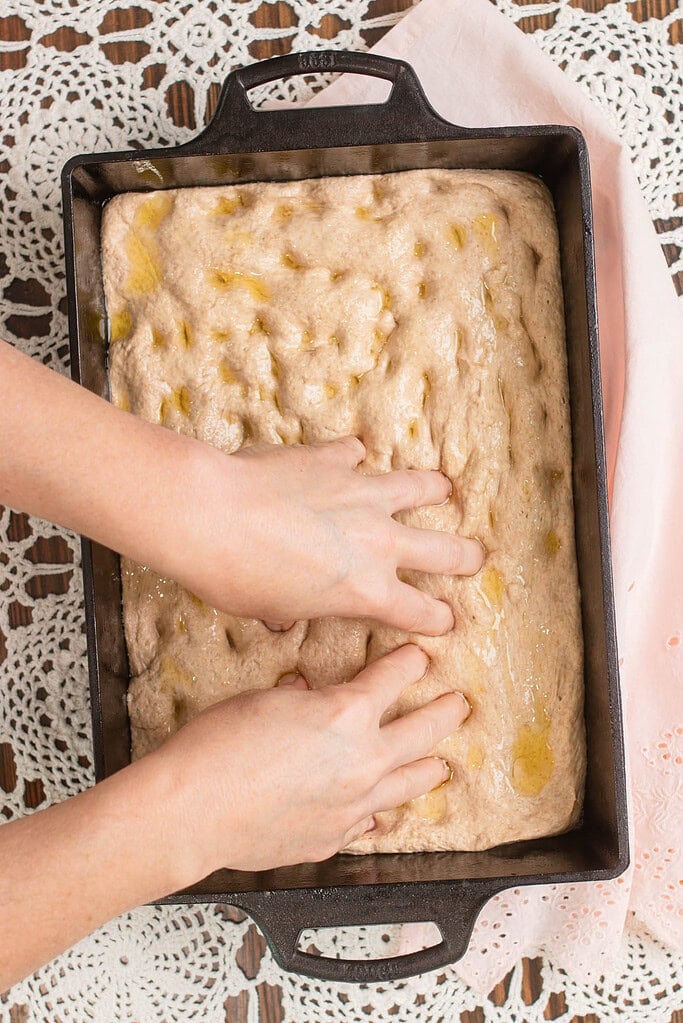
Dimple deeply and with confidence – press your oiled fingertips all the way through the dough to the bottom of the pan. Shallow dimples close back up during baking, and the surface puffs unevenly. Deep dimples hold the pooled oil and create the signature texture.
Rest the dough before stretching it to fit the pan – if the dough springs back when you try to stretch it, cover it and let it relax for 10 minutes before trying again. Forcing it tears the gluten and results in an uneven thickness across the pan.
Pull it from the oven when the edges are deeply golden – the bottom should be a rich amber color when you lift a corner with a spatula. If it looks pale at 25 minutes, give it another three to five minutes. A properly baked focaccia releases cleanly from a well-oiled pan.
Instructions
- Mill and measure the flour – mill hard white wheat berries on the finest setting and weigh 500 grams of freshly milled flour directly into a large mixing bowl. If your mill runs warm, let the flour cool for 10 to 15 minutes before mixing so it does not affect the starter activity.
- Mix the dough – add 75 grams of active sourdough starter, 368 grams of room temperature water, and 10 grams of salt to the flour. Mix with a dough whisk or your hand until no dry bits remain. The dough will be shaggy and sticky; this is correct for a high-hydration focaccia dough.
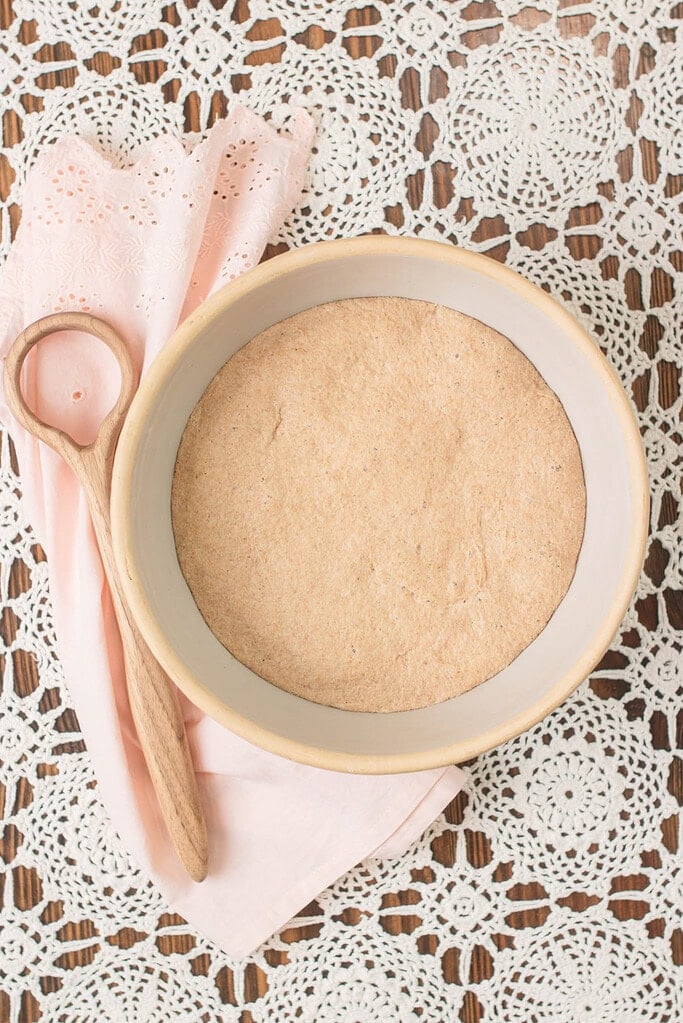
- Rest the dough – cover the bowl with a damp tea towel or reusable wrap and let the dough rest for 30 minutes. This initial rest allows the bran to begin hydrating and gives the gluten network time to start developing before the first stretch and fold.
- Stretch and fold – with wet hands, grab one side of the dough, stretch it upward as far as it will go without tearing, and fold it over the center. Rotate the bowl 90 degrees and repeat on all four sides. Cover and rest for 30 minutes. Perform three more sets of stretch and folds at 30 minute intervals for a total of four sets. The dough will feel progressively smoother and more elastic with each round.
- Bulk ferment – after the final fold, cover the bowl and let the dough ferment at room temperature until it has risen 50 to 75 percent, the surface has domed slightly, and bubbles are visible at the edges. This takes four to six hours at 72 to 75°F. For an overnight ferment, transfer the covered dough to the refrigerator after it has risen 30 percent and let it finish slowly overnight for eight to twelve hours.
- Prepare the pan – pour 2 tablespoons of extra virgin olive oil into a 9×13 inch metal baking pan and spread it evenly across the bottom and up the sides. Transfer the dough into the pan and turn it once to coat both sides in oil. Let the dough relax for 10 minutes, then use wet hands to gently press it toward the edges. If it springs back, cover and rest another 10 minutes before stretching again.
- Second rise – cover the pan loosely and let the dough rise at room temperature for two to four hours until it is puffy, jiggly, and nearly doubled in height. If you used the overnight refrigerator ferment, allow the dough to come to room temperature for one to two hours before the second rise.
- Preheat the oven – set the oven to 425°F and allow it to preheat fully for at least 30 minutes before baking. A thoroughly preheated oven is what creates the dramatic oven spring and deeply crisped edges that define a well-made focaccia.
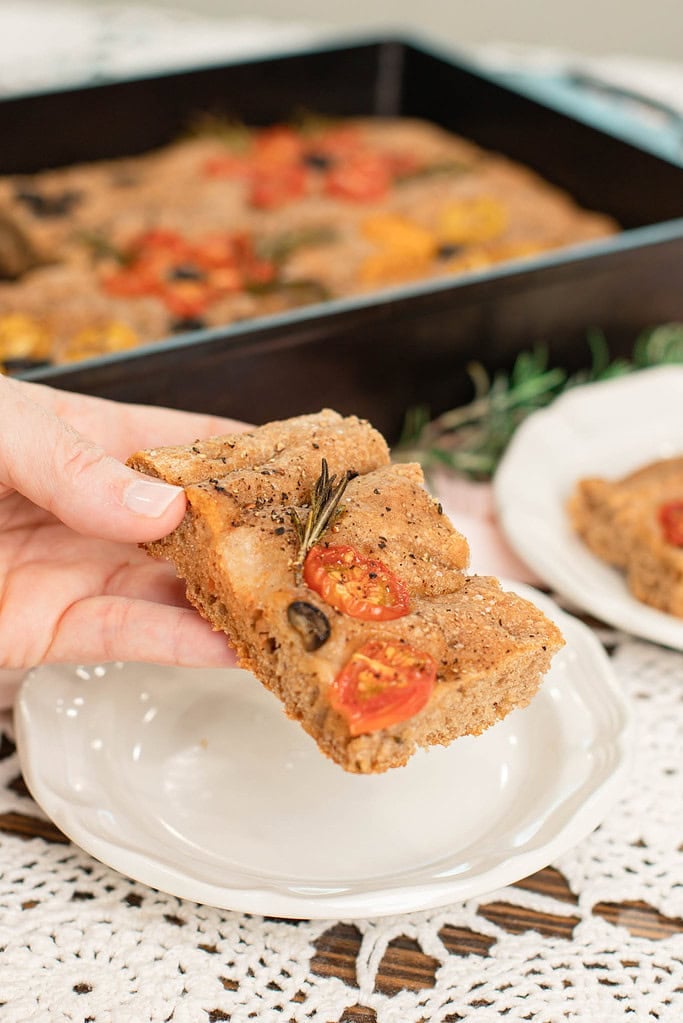
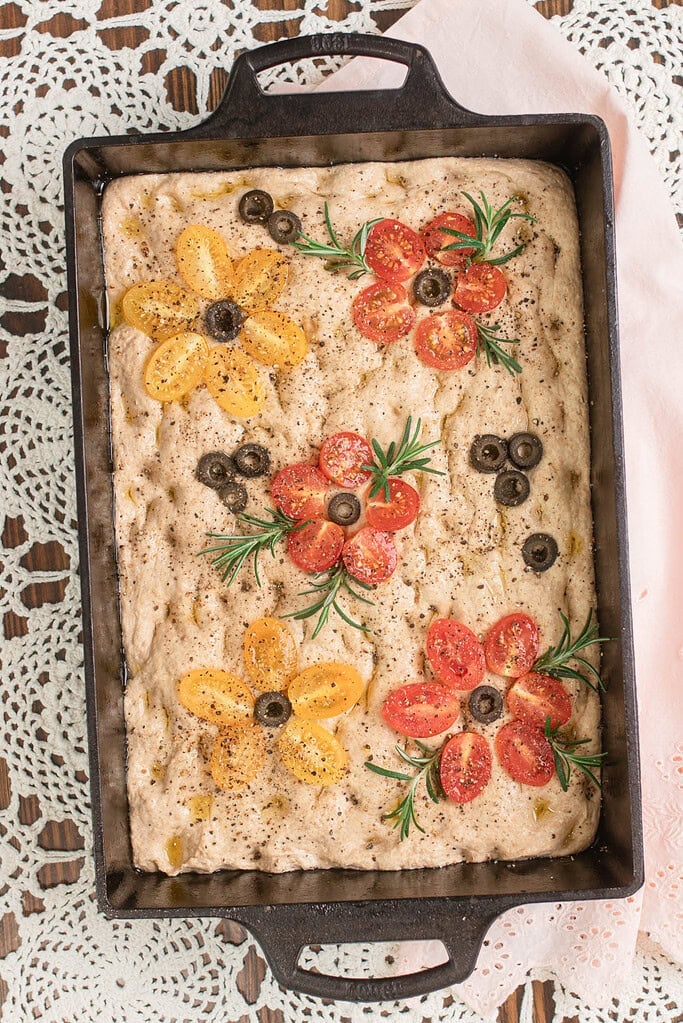
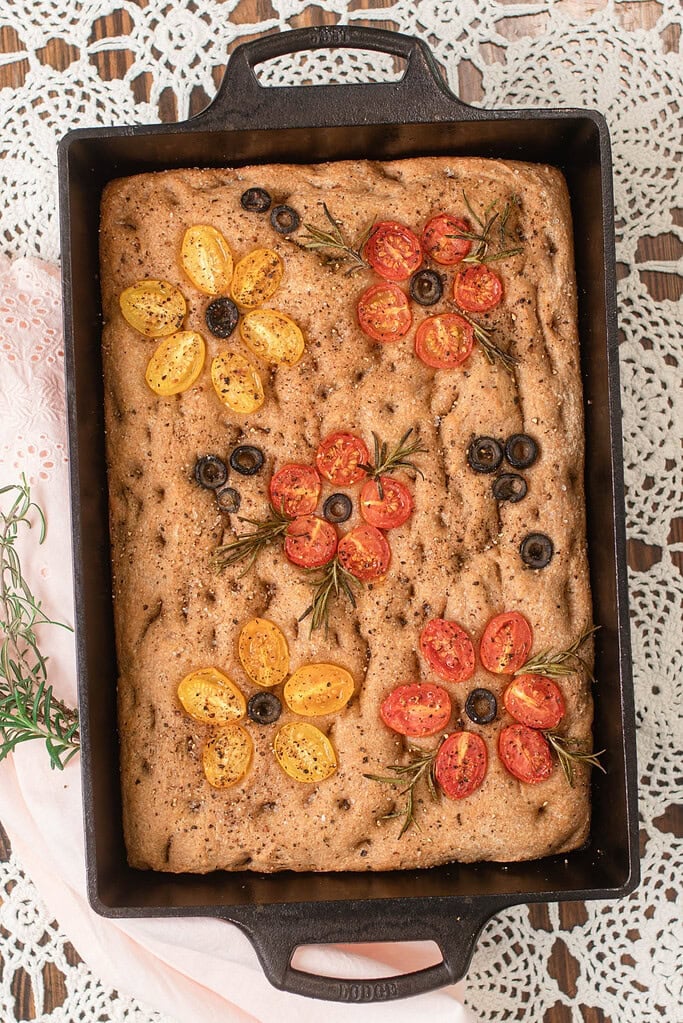
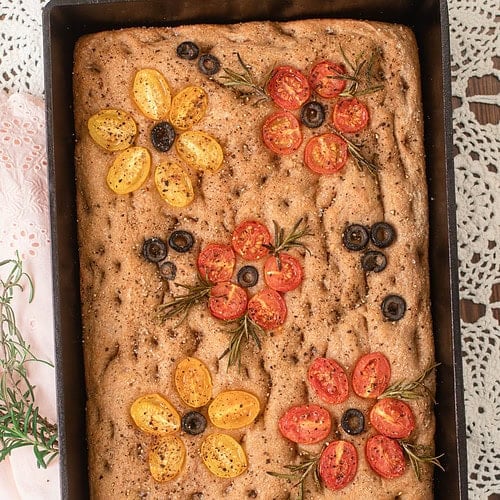
- Dimple and top – drizzle the remaining 2 tablespoons of olive oil over the surface of the dough. Lightly oil your fingertips and press them firmly all the way down through the dough to the bottom of the pan across the entire surface. Scatter coarse salt generously over the top. Add rosemary sprigs, thinly sliced garlic, halved cherry tomatoes, or sliced olives if using.
- Bake – place the pan on the center rack and bake for 20 to 25 minutes until the top is deep golden brown and the edges have pulled away slightly from the sides of the pan. Lift a corner with a spatula to check the bottom, it should be a rich amber color. If the bottom looks pale at 25 minutes, return the pan to the oven for three to five more minutes.
- Cool and serve – remove the focaccia from the pan immediately and transfer it to a wire cooling rack. Let it rest for at least 20 minutes before slicing so the crumb can set. Serve warm with good olive oil and balsamic vinegar for dipping, alongside Italian Tomato Basil Bruschetta.

Freezing and Storage
- Room temperature – store the cooled focaccia in an airtight container or wrapped in beeswax wrap for up to 2 days. The crust will soften overnight, which is normal — a few minutes in a 350°F oven brings it back to crispy and warm before serving.
- Refrigerator – wrap the focaccia tightly and refrigerate for up to 5 days. Reheat individual slices in a 350°F oven for 5 to 8 minutes rather than the microwave, which makes the crumb gummy and the crust soft.
- Freezer – slice the focaccia before freezing so you can pull only what you need. Wrap individual slices in parchment, transfer to an airtight freezer bag, and freeze for up to 3 months for best quality. Thaw at room temperature for 20 to 30 minutes before reheating in a 350°F oven for 8 to 10 minutes until the edges are crispy again.
- Fresh milled flour storage – if you milled more flour than the recipe requires, store the excess in an airtight container at room temperature for up to 2 to 3 days, in the refrigerator for 4 to 7 days, or in the freezer for up to 6 months. Bring refrigerated or frozen flour to room temperature before baking for the most consistent results.
FAQ
Join The Community
Want More Cozy Recipes & Seasonal Inspiration?
Get cozy, from-scratch recipes, seasonal cottage living tips, and slow living inspiration delivered straight to your inbox.
More Sourdough Recipes from the Cottage
⭐️ Rate This Recipe
Made this recipe? Leave a star ⭐️ rating below, it means the world to me and helps my recipes get found by more people like you.

Sourdough Focaccia with Freshly Milled Flour
Equipment
- 1 Large mixing bowl
- 1 Dough whisk
- 1 Kitchen scale
- 1 9×13 cast iron pan or baking pan
- 1 Wire Cooling Rack
Ingredients
For The Dough
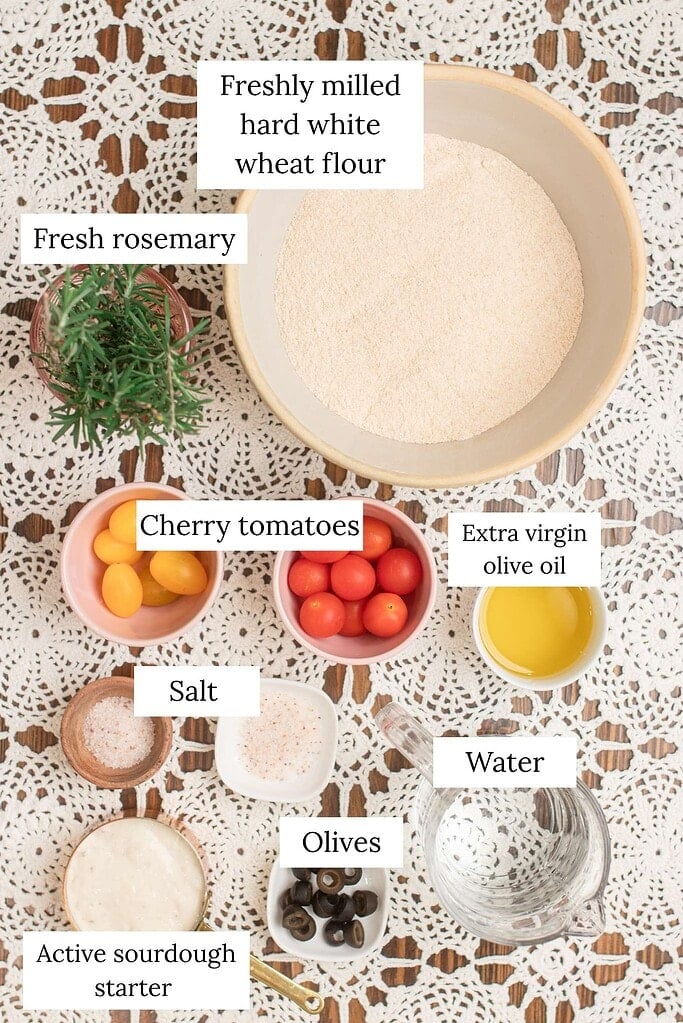
- 2½ cups freshly milled hard white wheat flour 500 grams
- ⅓ cup active sourdough starter 75 grams
- 1½ cups water room temperature, 368 grams
- 2 teaspoons salt 10 grams
- 4 tablespoons extra virgin olive oil divided, 60 grams
For The Toppings
- ½ teaspoon coarse salt about 3 grams
- 1 tablespoon fresh rosemary chopped, about 5 grams (optional)
- 2 cloves garlic thinly sliced, about 10 grams (optional)
- ½ cup cherry tomatoes halved, about 75 grams (optional)
- ¼ cup olives sliced, about 50 grams (optional)
Instructions
- Mill and measure the flour – mill hard white wheat berries on the finest setting and weigh 500 grams of freshly milled flour into a large mixing bowl. If the flour is warm from milling, let it cool for 10 to 15 minutes before mixing.
- Mix the dough – add 75 grams of active sourdough starter, 368 grams of room temperature water, and 10 grams of salt to the flour. Mix with a dough whisk or your hand until no dry bits remain. The dough will be shaggy and sticky, this is correct for a high-hydration focaccia dough.
- Rest the dough – cover the bowl with a damp tea towel or reusable wrap and rest for 30 minutes. This allows the bran to begin hydrating and gives the gluten network time to develop before the first stretch and fold.
- Stretch and fold – with wet hands, grab one side of the dough, stretch it upward as far as it will go without tearing, and fold it over the center. Rotate the bowl 90 degrees and repeat on all four sides. Cover and rest 30 minutes. Perform three more sets at 30 minute intervals for a total of four sets. The dough will feel progressively smoother and more elastic with each round.
- Bulk ferment – cover and ferment at room temperature until the dough has risen 50 to 75 percent, the surface has domed slightly, and bubbles are visible at the edges, about 4 to 6 hours at 72 to 75°F. For an overnight ferment, transfer to the refrigerator after a 30 percent rise and ferment for 8 to 12 hours.
- Prepare the pan – pour 2 tablespoons of olive oil into a 9×13 inch metal baking pan and spread evenly across the bottom and up the sides. Transfer the dough into the pan and turn it once to coat both sides in oil. Rest 10 minutes, then press gently toward the edges with wet hands. If the dough springs back, cover and rest another 10 minutes before stretching again.
- Second rise – cover the pan loosely and rise at room temperature for 2 to 4 hours until puffy, jiggly, and nearly doubled in height. If coming from the refrigerator, allow 1 to 2 hours at room temperature before the second rise begins.
- Preheat the oven – set to 425°F and allow it to preheat fully for at least 30 minutes before baking.
- Dimple and top – drizzle the remaining 2 tablespoons of olive oil over the surface of the dough. Press oiled fingertips firmly all the way through the dough to the bottom of the pan across the entire surface. Scatter coars alt generously over the top and press in any optional toppings.
- Bake – place on the center rack and bake for 20 to 25 minutes until the top is deep golden brown and the edges have pulled away slightly from the sides of the pan. Lift a corner with a spatula to check the bottom — it should be a rich amber color. If the bottom looks pale at 25 minutes, return to the oven for three to five more minutes.
- Cool and serve – remove from the pan immediately and transfer to a wire cooling rack. Rest at least 20 minutes before slicing so the crumb can set. Serve warm with good olive oil and balsamic vinegar for dipping, alongside Homemade Minestrone Soup, or paired with Italian Tomato Basil Bruschetta for a full Italian-inspired spread.
Notes
Did you make this recipe?
Rate it 5 “⭐️” below.
If you liked this recipe, I’d be so grateful if you would share it with others. Use the buttons below to share, comment, or connect.

Emily Rider
Home miller since 1999 with fresh-milled flour & sourdough experience. Sharing from-scratch recipes and traditional kitchen skills, rooted in the seasons and inspired by everyday cottage living and seasonal rhythms.